Friday 26 February 2016

Tiny Frames

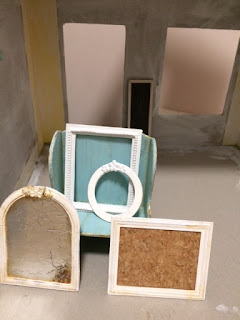
Alright, these are my favourite thing that I've made so far! I tried lots of different things and it was a really great learning experience.  (The tall, skinny blackboard on the right is the one I made a while ago.  I'm just including it for the sake of completeness).


Blackboard: That was the first frame method I tried and I did it the 'regular' way one would, using wood, sanding it down, chamfering the edges, cutting the ends at a 45 degree angle, creating a 90 degree join.... It was very fiddly and tough to keep it square (still haven't made a gluing jig).


Arch-topped mirror: For this one, I used card in two different thicknesses.  I made the top using a circle die which I ran through my die-cutting machine (it's a Big Shot. I got it last summer and I adore it, even though it nearly cost me my marriage to Mr Gypsy because I made him drive out of the way to go buy it from an amazing craft shop in the middle of Dorset's the New Forest). So I had 4 pieces for this frame: the three sides of the square and a semi circle for the arch.  I glued them together on graph paper, which helped keep my corners square, and then cut it away with a craft knife afterwards.  Then I drew around it onto a thick piece of card and sandwiched a piece of tinfoil between the two.  The glue I used was white PVA glue.


Circular frame: several circles die cut from card and then glued together.  Three little flat-backed flowers. Gesso.

Corkboard: layered cardboard, glued onto a pre-cut rectangle of card. Mitre-cut edges etc.

White chunky frame with beading: By the time I made this one, I was fed up of messing about with tiny, fiddly strips of card and I realised: the beauty of using card instead of wood is it's cheap! So this final one was quite simply a rectangle cut out of some thick book board card, with a smaller rectangle cut out of the middle of it.  Then I cut out another skinnier rectangle to glue on top of it and glued some tiny bead strands on top of that for the... well for the beading.  It's my favourite frame and my favourite method by a mile!


Shabby welsh dresser (or kitchen hutch)


Having seen so many of these beautifully packed with tiny treats and beautiful enamelware, I was very keen to get started on making one.  As a result, I made it sort of along side the little bed and using the same painting technique so I'm not overjoyed about the colour.  It's a bit too much shabby and not quite enough chic.


 But I like the overall look of it. Even if it is probably a little bit short!


Shabby bed

My tiny bed is made from cardboard, layered together. It was a bit of an experiment and didn't turn out quite as well as I had planned in my tiny brain: the cardboard is too thin and looks flimsy; one of the side bits underneath the base is wonky (I need to make a glue-ing jig); and I tried a new paint technique which didn't go so well.  But I learnt a lot.  And if I write it down here then I stand a half-decent chance of actually remembering what.


To make the decorative parts on the headboard and footboard, I took inspiration from this fabulous lady here.  I used dimensional paint from my scrapbooking supplies to make the little curly bits.  The heart is punched out of card.  It quite like how this ended up.

The problem came with the paint: I followed a paint distressing tutorial that suggested starting with a dark brown coat, then following up with a light coat and then using a file on the edges to reveal the dark paint beneath. Well I probably used the wrong kind of paint: I used a dark brown acrylic. Then, when that had dried, I started painting white acrylic over the top but it just sort of 'woke up' the brown paint and then I was left with a horrible yucky mess, which I tried to fix by spraying the whole lot white.  The spray left a nasty, cheap-looking sheen on in and didn't cover the gross brown mess.  I know the picture of the bed isn't great - it's not worth uploading a better one - I just wanted to show the technique with the dimensional paint.


Chandelier

As a first attempt, I was quite pleased with how this turned out! I know it's a bit rickety - I can't find any thicker gauge wire at the moment so I just twisted together some really thin copper filament.


I used the tutorial from here, with the exception of the real lighting bit (baby steps - I'm still a novice).  I used jewellery findings as sconces and beads for candles, as suggested in the tutorial but, when attaching the sconces, I wound the wire round the curlicue at the bas of the chandelier and then up through the jewellery finding and through the bead 'candle'.  Then I cut the wire, leaving a bit for the wick, which I dabbed with a little black acrylic paint.  I know real chandeliers don't have real candles anymore and this would probably burn my tiny house to ashes if it were real.... But I figure, if I can't have 'real' candles in my tiny fantasy house then what's the point? (I haven't had real candles in my 'big' home since before the boys were born!)

High-backed Pew

This is a little bench chair or pew. It is carved out of foam board and then I chamfered the edges with a flat metal file. Foam board won't take paint, so I gave it two coats of gesso and sanded it again before painting it with blue gouache.  Then I sanded it on the edges for ageing and dry-brushed on some brown acrylic.


I think I might have said before - I know nothing about art! I have no experience of paint and i don't know the difference between them. When I look at the beautiful paint effects on other blogs, I realise that this is a key skill in making our minis fab, so I have started experimenting with different paints. I loved the gouache here - it goes on so thick and gives really good coverage. I like the matte finish on it too, and the fact that it's a bit textured (or maybe that's just the gesso coming through?).

Fireplace

Here's a little fireplace I made.  The grate and the firebox are made of black card and toothpicks.  The surround and mantel are foam board.  As it's quite thick, you can cut it on an angle with your craft knife and end up with a sort of bevelled edge.  It also files down nice and smoothly. I have a small set of metal files that I'm using to make most of my bits at the moment.  I am having lustful thoughts about a Dremel tool, or a lathe... but until we decide to settle down, it's not very practical. Anyway, it's a nice problem-solving exercise to think of alternative ways of making things than the obvious.


The decorations below the mantel are three little metal charms from a haberdashery.  I stuck them on with hot glue and then painted the whole lot with gesso, then white acrylic, then dry-brushed on a little brown grubbiness.


You can see how I made it from the back here.  The backplate is part of an egg box.


The toothpicks have a nice little decorative carving at the top. I glued four sticks along a strip of black card and then glued a narrower strip of card above. The bottom of the grate is thin strips of card, woven together and glued. I gave the whole thing a spray with some blackboard paint and then brushed on some pearlescent eyeshadow for patina.


I made the grate a little too big and it sticks out of the front.  It's also missing a hearth but I'll get around to that when I build the ground floor of the cottage.

Inside my tiny cottage....

These are the first two things I made to go in the cottage. The little framed blackboard, I haven't decided what to do with yet. It may hang on the wall in the kitchen, as a handy place to write a shopping list. Or I may add some nice blackboard writing and hang it horizontally over one of the windows.

The little butterflies are from a Kaisercraft paper stack (the one I made my sister-in-law's book from). They are so tiny and cute! I glued them to a white painted bit of wood and hung it on a tiny piece of chain that I bought from an awesome haberdashery mall here (more on that in another post). Then I inked the edges green. You can see that I am edging towards the beautiful shabby chic colour ways of some of my favourite bloggers who have inspired me to start making minis! (I'm talking about YOU, Liberty Biberty and Cinderella Moments!) I adore their dreamy white and pastel interiors and I'd like to try and recreate something similar.


(The bed is a later creation but I'm way behind on updating this blog and I'm trying to go in order)

Dollshouse? Dollhouse? Dolls' House? Doll's House?

We are all on holiday from school at the moment because it's Chinese New Year. Not long ago, Mr Gypsy and I would be on a beach somewhere hot right now, getting tanned and wasted, but with a two-year-old and a one-year-old in tow, holidays just ain't the relaxing, carefree time they used to be!  Our last trip (touring the UK in a camper van) was plagued with illness and bad weather and left us so traumatised that we literally haven't been away since. There have been three school breaks since that trip and we've elected to stay at home. Every. Single. Time.

The kids are growing so fast though and soon we'll be a bit more mobile again. I can't wait to take them on some proper gypsying. In the meantime, it's a perfect opportunity to immerse myself in some grubby indoor crafting, while the boys play with their train set.

Winter in Shanghai is not the best - even if you are someone who enjoys cold weather (which I decidedly am not).  It has been bitterly cold recently and we had a stretch of five straight days this week when the pollution was so hazardous that we really didn't want to take the kids out in it. Again - great excuse to hang out at home and get craft-crazy! So I started on a project which has been fermenting in my brain ever since I saw this lady's spectacular craft blog, Liberty Biberty, and cemented last week when I stumbled on the stunning little houses here at Cinderella Moments. Swoooooon! Such beautifully crafted little houses and tiny little details and things.... Must! Make! Tiny stuff!

So I did.


Although I did tonnes of sketches over a few weeks and even made a mockup out of moving boxes, I held fire on starting the build because I don't have woodworking tools and was trying to think how I could cut the wood. If I were in England, it would be easy enough to pop into my local DIY store with my paper plans (I drew everything out on graph paper) and get the wood cut to spec. If I were in Australia, I could ask my father-in-law to teach me in his shed. If I were in Thailand, our awesome local picture-framing shop would be happy to help me out. But here in China, it just wasn't going to be so simples.
So I figured I'd take a leaf out of Mercedes' book and just "do what I can with what I have." And what I have is a LOT of paper and card.


I've used book board - the really heavy duty cardboard that is used to make ring binders etc, which I cut with a stanley knife. The pieces are joined together with cardstock, on the inside and the outside of the join, and white PVA glue. I made sure to burnish the cardstock really well to bind the two materials together as best I could. Obviously, this is not an ideal construction material and the whole time, in the back of my head was the story of the three little pigs making dumb houses out of totally impractical things.... But I figure this is my first attempt. If I can make it work- great. If not, it will have been a very useful lesson and then I can improve on it the second time around.


I've painted it inside and out with gesso and now I'm trying to decide what to do about reinforcing the walls.  As you can see, the side walls are considerably bowed.  I could have solved this problem by extending the upper floor out to the same level as the ground floor but I didn't want to make it too dark and poky downstairs.

I considered making a frame out of square dowel (something I could cut with a small hacksaw, one of the few tools I *do* have)... but I hadn't been able to find dowel anywhere yet and I was impatient to get started.  Then I started thinking about concrete because I saw a blog where someone had used that to create texture on the outside walls and I thought that might help make the structure rigid and straight if I did one wall at a time and supported it horizontally while it dried. But I can only find gigantic industrial sized bags of it and Mr Gypsy would have my guts for garters if I came home with one of them.  Ditto for plaster rendering - only massive bags. And anyway, mortar or plaster might just crack and make a mess.

So now I'm back to paper again.... I'm going to have a bash with some papier mache.  If I'm lucky, that combined with the added structural support that will come from attaching the roof, might just solve the issue.  Or it could make it much worse. Either way, there's only one way to find out!


********************

Here's a little something else I made recently for a friend's birthday.


It's an explosion box. The map is a vintage one of China with all the different places she's lived here.


 I couldn't decide whether I wanted the greeting or her name the top of the box.


In the end, I decided the inside looked nicer with her name than it did with the greeting, which was a bit dark next to the black-framed photos.  Each of those four flaps opens out and contains a mini-card with messages from lots of different friends. 

Wednesday 10 February 2016

Deconstructed Cardboard

I am obsessed with this at the moment.  I first saw it on Pinterest at this blog here.  I just like the contrast of the textures and the way the shadows move.  I also love the upcycling of a 'rubbishy' material and kraft is one of my favourite colours, for being so versatile.

This was a birthday card I made for a friend. The heart at the bottom is punched out of a Starbucks coffee cup holder.  They have nice neat little ridges, like the corrugated cardboard. I average a coffee a day and started keeping these holders about three months ago so my stash is probably big enough now that I should stop using the tax-avoiding gits and go to the nice little independently owned cafe across the street. If only crossing the street didn't involve walking four times the distance and taking the lives of myself and my two toddlers in my hands. (Shangers drivers be cray cray)

Materials used: white base card 15cm x 15cm, kraft cardstock, old book page (I could only conscience using a book that was already falling apart at the spine), black cardstock, tracing paper, Tim Holtz stamp, charcoal embossing powder, frame die, white acrylic paint, Hobbycraft heart hand punch, red acrylic paint, crackle glaze, feather, old cardboard packing box, coffee cup holder.

My First Mini Album

As well as scrapbooks, I ADORE mini albums! I love Googling them, watching tutorials on YouTube... I have dozens of them pinned on Pinterest. Seeing all the incredible designs really inspired me and I must have watched dozens of videos of people showing off their latest creations. I got so many ideas from so many different posters that I've lost track of who they all were.  I can't take any credit for originality on this one but I was really happy with how it turned out

This was the very first one I made.  It was a gift for my lovely sister-in-law, who is also mad-crafty and has made my boys the most adorable quilts. She had recently gone on a big round the world trip and loved Paris so I thought I'd make her something to put her France photos in.

 The cover is book board; I attached the front and back covers to the spine with Duck tape and then covered the whole lot in A4 sized self adhesive kraft labels, which I stamped with a Tim Holtz and Stampers Anonymous stamp set.  These kraft labels were a Thai brand that I bought when we lived there and were cheap as chips.  If I'd known how much I would end up loving them and using them, I would have bought a whole bunch more before we moved here to China.


These adorable little charms, the Eiffel Tower and the Arc de Triomphe, I bought in a really cute little shop in Shanghai. The lace strip with the beads on it was a bracelet I bought from a student enterprise group at my last school. The flower was made using a method I found here on this blog.


I made it using A5 sized brown envelopes for the pages, attached with Cathy Orta's Hidden Hinge binding system.


 The paper inside is from a paper stack from Kaisercraft, in Australia, where my in-laws live. It's a gorgeous mix of blues and greens and pink and brown and it's covered in butterflies and French script - so romantic and shabby chic.


The nacre buttons are from Chinatown in Bangkok, which is full of awesome beads and jewellery-making bits and bobs. The flowers and the leaf skeletons are from Chatuchak Market in Bangkok, which also has loads of fantastic mulberry papers and all kinds of handmade items for sale. Oh and that ticket stamp was free with a magazine I bought in good old Blighty, so England gets a nod too :)


Inside the back cover is a vintage style map of Paris that I found in the Japanese version of a Pound Shop or a Dollar Store, which brings the number of countries represented here to six: Thailand, China, France, Australia, England and Japan.


Tuesday 9 February 2016

A Journey of a Thousand Miles Begins With a Single Step

Although I used to mess about with Fimo when I was a kid, and make odds and ends, I wouldn't have described myself as a crafty person and certainly I never really took to art at school or pursued it in my free time after the age of ten. But in the last three years, getting crafty has become a total obsession - one that has taken over an increasing amount of our family home and now has an entire room dedicated it. So I guess you could say I'm a born-again crafter... and living proof that there is none so devout as the converted!

It began when I was on maternity leave from work with our first son.  I got a black ink pad and a book of watercolour paper and I made a whole bunch of prints of his tiny hands and feet and I made them into cards to send people, thanking them for the baby gifts. Of course, after I started sending them off to people, it occurred to me that if I kept posting them away, I wouldn't get to keep them! So I took a nice old photo album and I started scrapbooking as a way to keep a record of all the little everyday moments of my young son's life.

There were some a-m-a-z-i-n-g stationery shops in Bangkok, where we living at the time, and once I saw all the beautiful papers and embellishments available - that was it - I was hooked! So now, three years, a different country and another baby later, every free bit of time I have at home, I'm in my craft room, surrounded by a mess of paper and glue.

where it all began...